Droid Vision on an RC Truck
Introduction
I love robots, AI, and racing. I have always been curious about what the world looks like through the lens of a mobile robot, so I created the Droid Vision app. It can be downloaded for free from the Apple Store and Google Play.
With “Droid Vision”, I can play with my cat in Augmented Reality using an RC car, which means I become the RC car and chase the cat.
The app fetches the video data from the RTSP service running on the robot. In this blog, I will show you how to install the RTSP streaming service on a Radio-controlled truck and use the Droid Vision app to create videos like these:
Radio-controlled Car
The RTSP streaming service will be installed on a Raspberry Pi with the Pi Camera. Therefore, the first step is to find a RC car with space for the Raspberry Pi and camera.
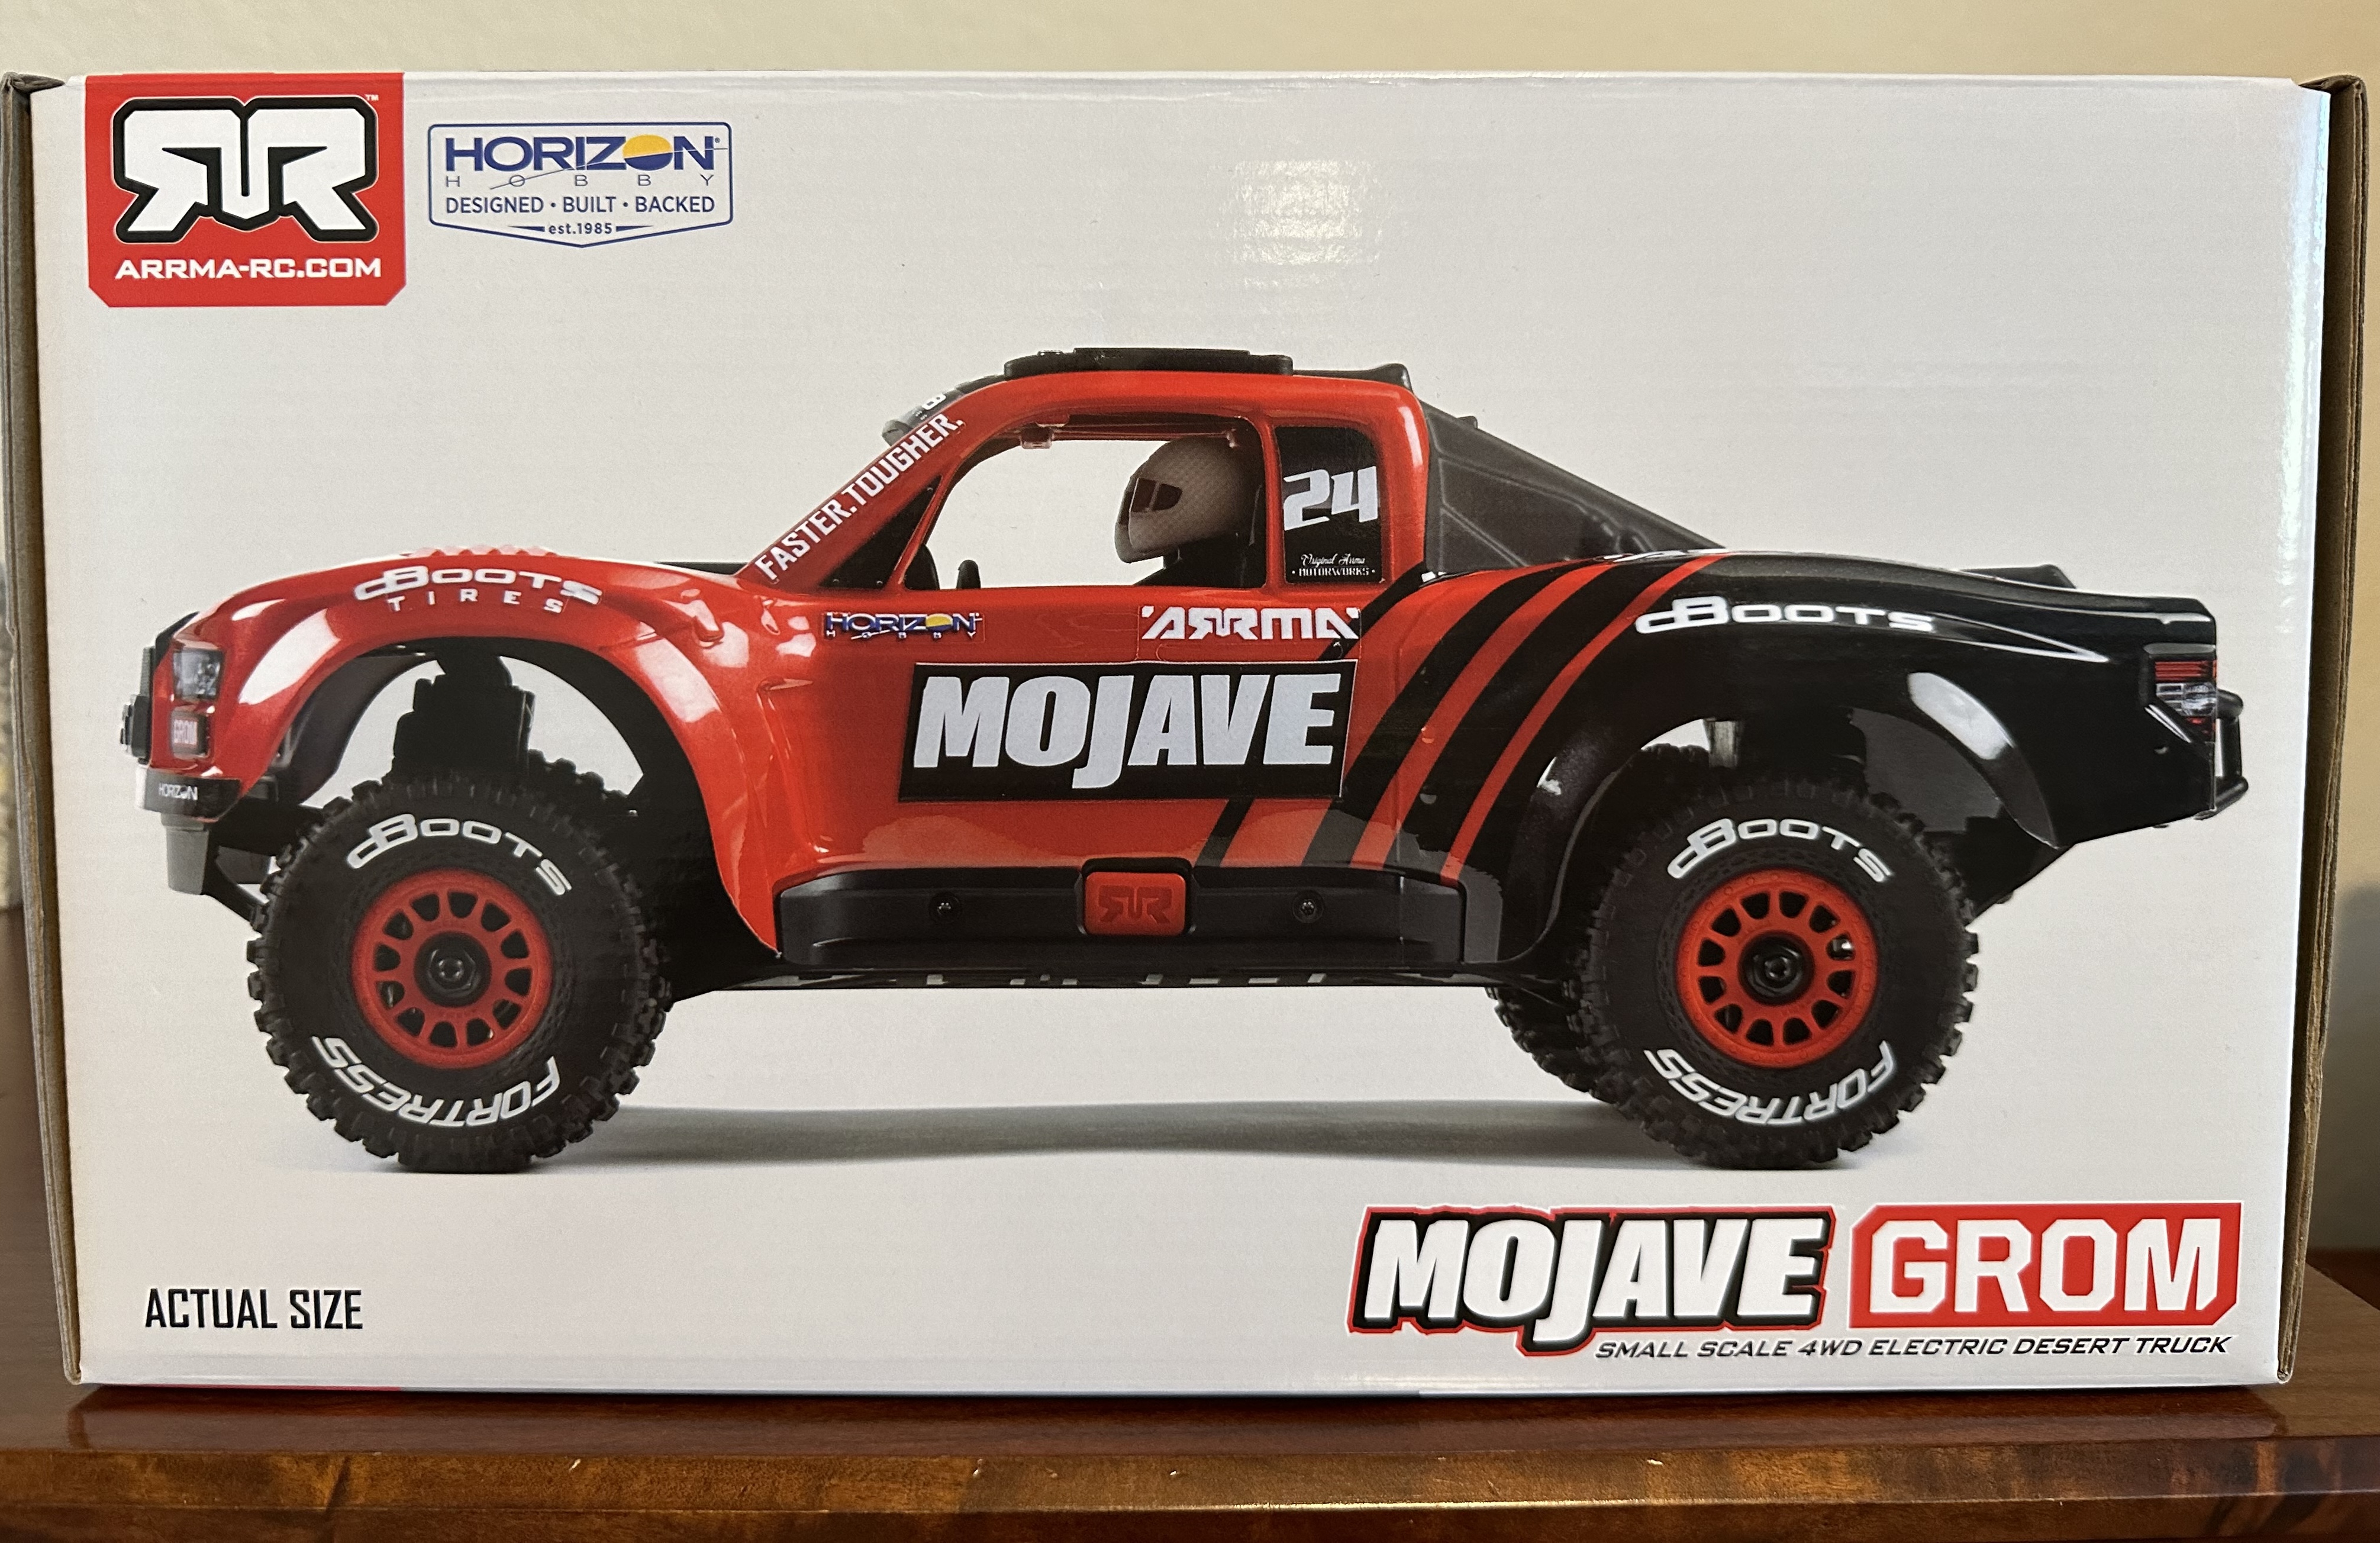
In a local hobby shop, I found one like this. It is called the “Mojave Grom 4X4 Desert Truck” from Arrma RC. The truck is about one foot long, half a foot wide, and half tall. It is a good size for the Raspberry Pi. The truck has a radio receiver controlling the wheel’s rotation and turning. Besides the truck, the set has a Spektrum Radio control, a LiPO battery, and a USB charger. The truck is ready to run once the battery is charged. The whole set costs $149.99, which I think is reasonably priced.
This RC truck is durable. I occasionally drove it into a wall or a curb, but the front and back bumpers absorbed the impact, so the frame remained unharmed.
Upgrade the RC truck with a Camera
Now, it is time to upgrade the RC truck. I removed the outer shell and the “drivers”, and replaced them with the Raspberry Pi and the Pi camera.
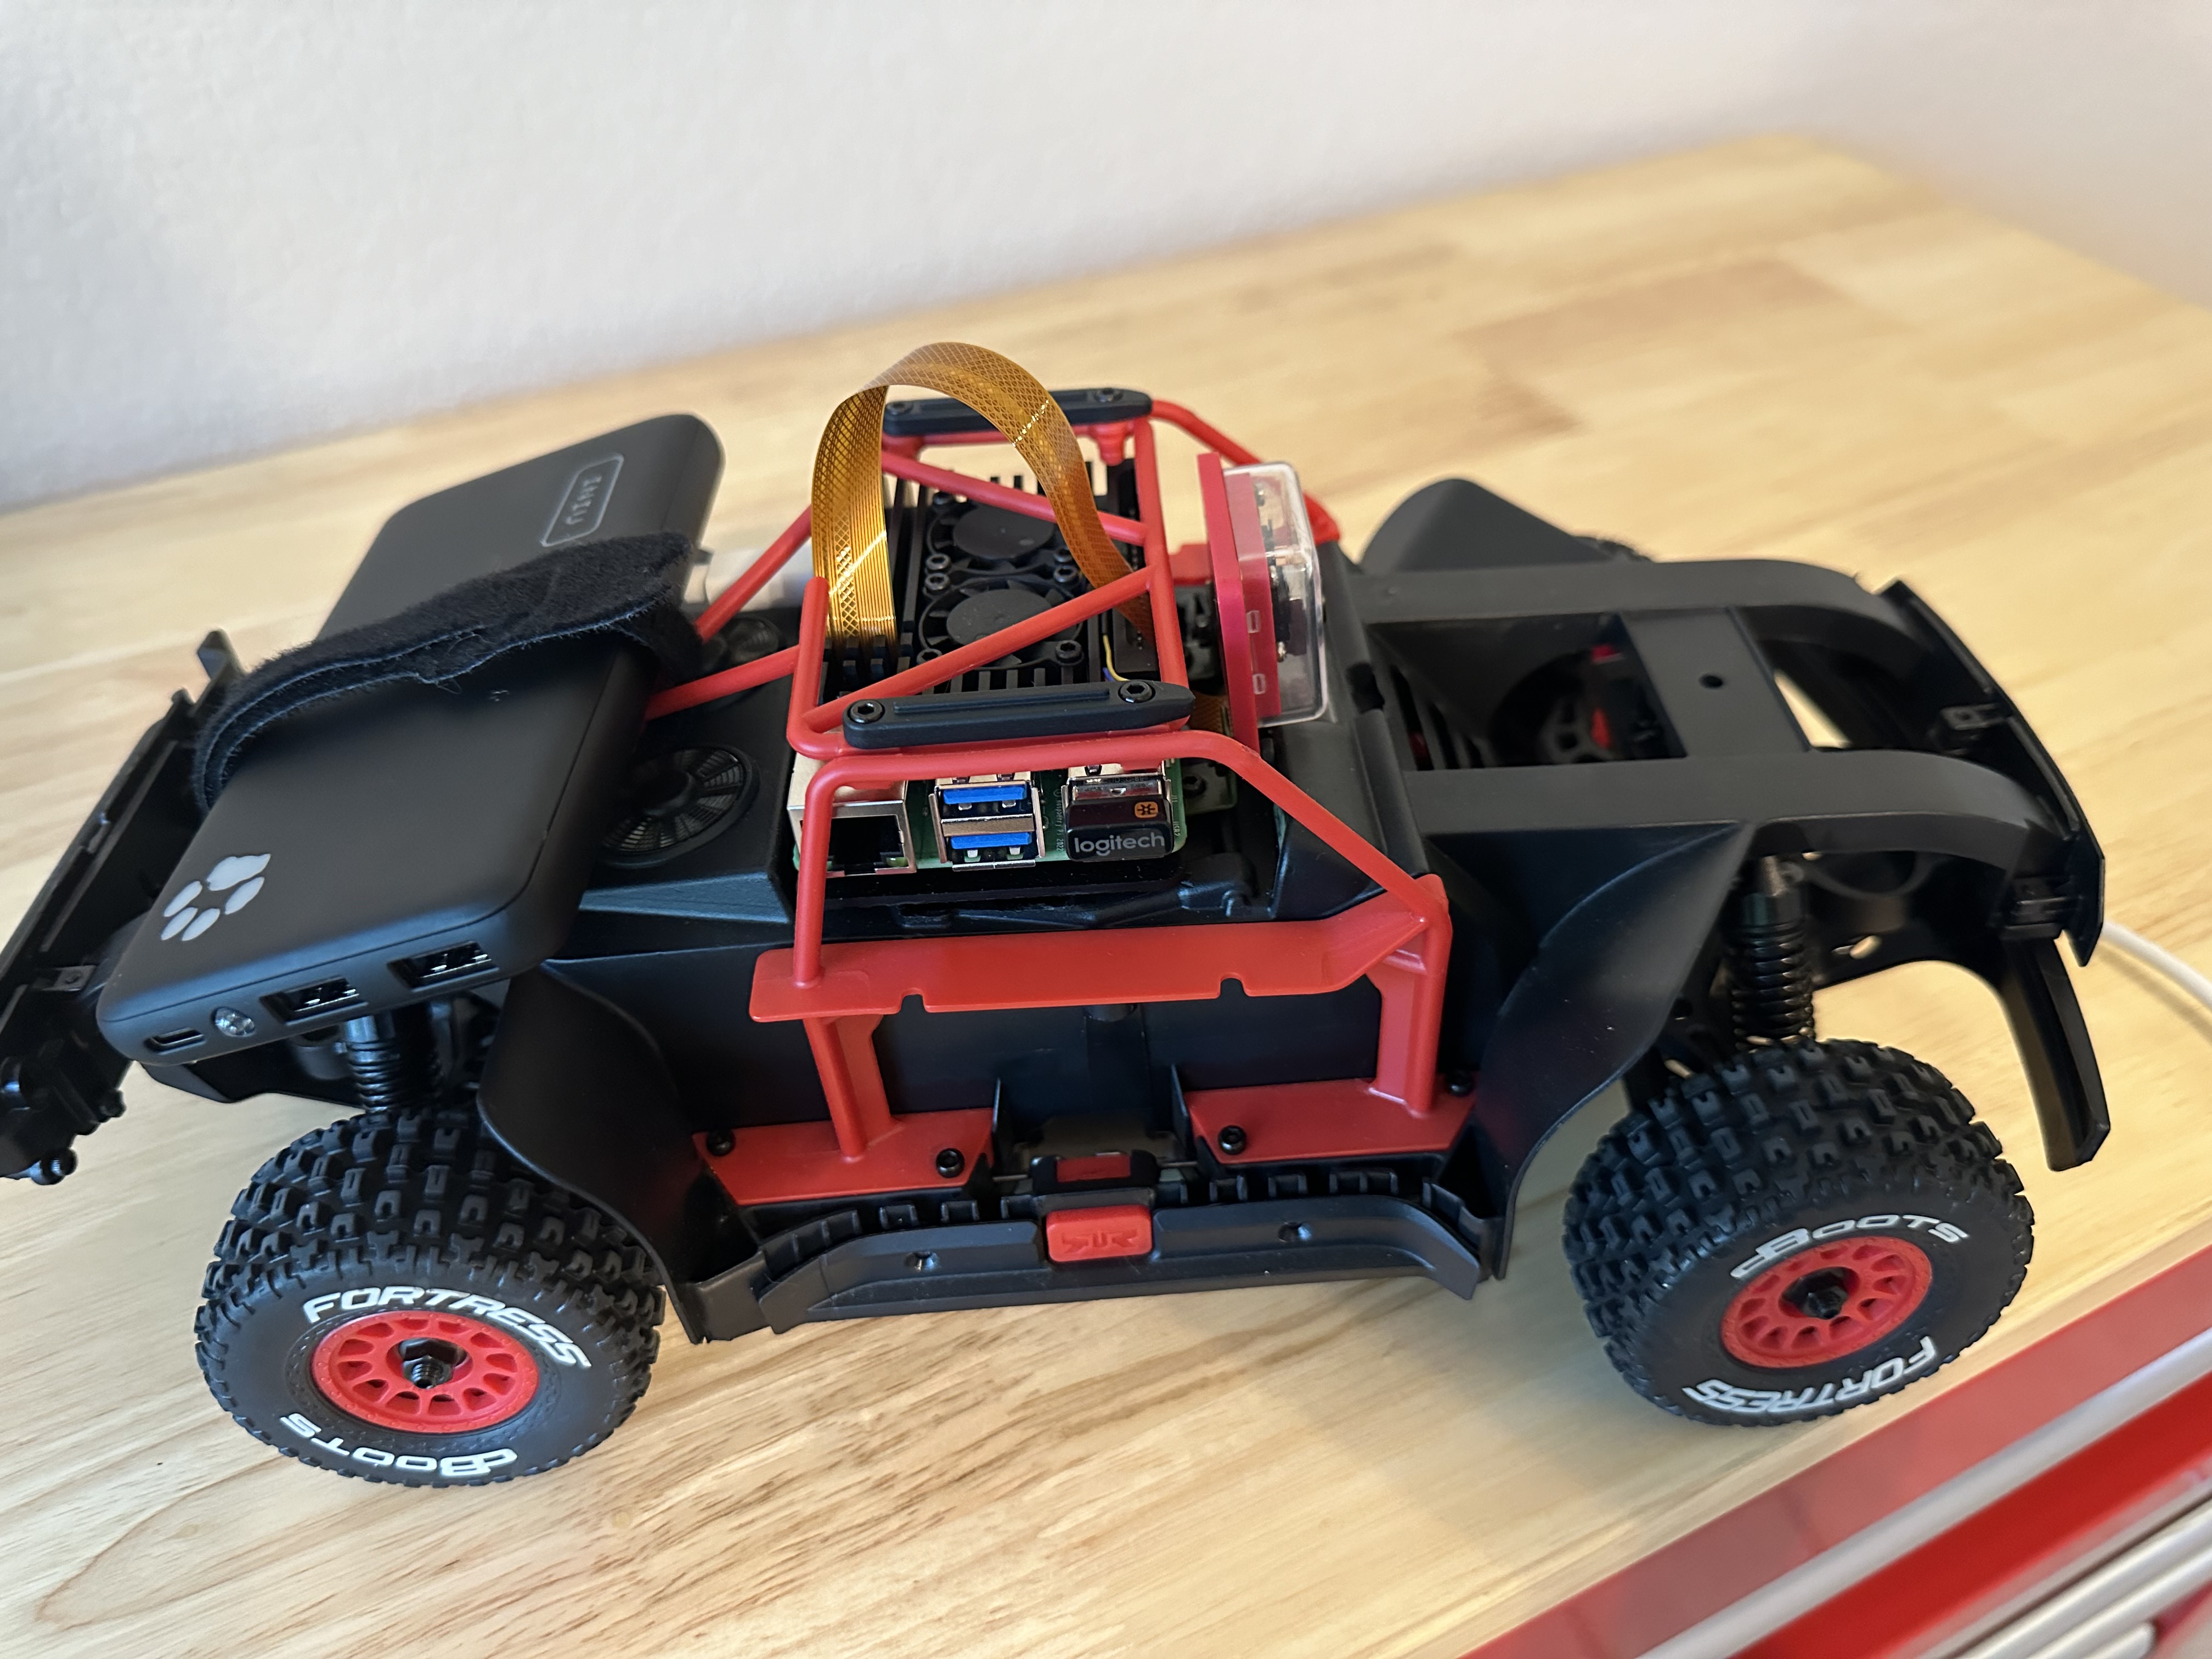
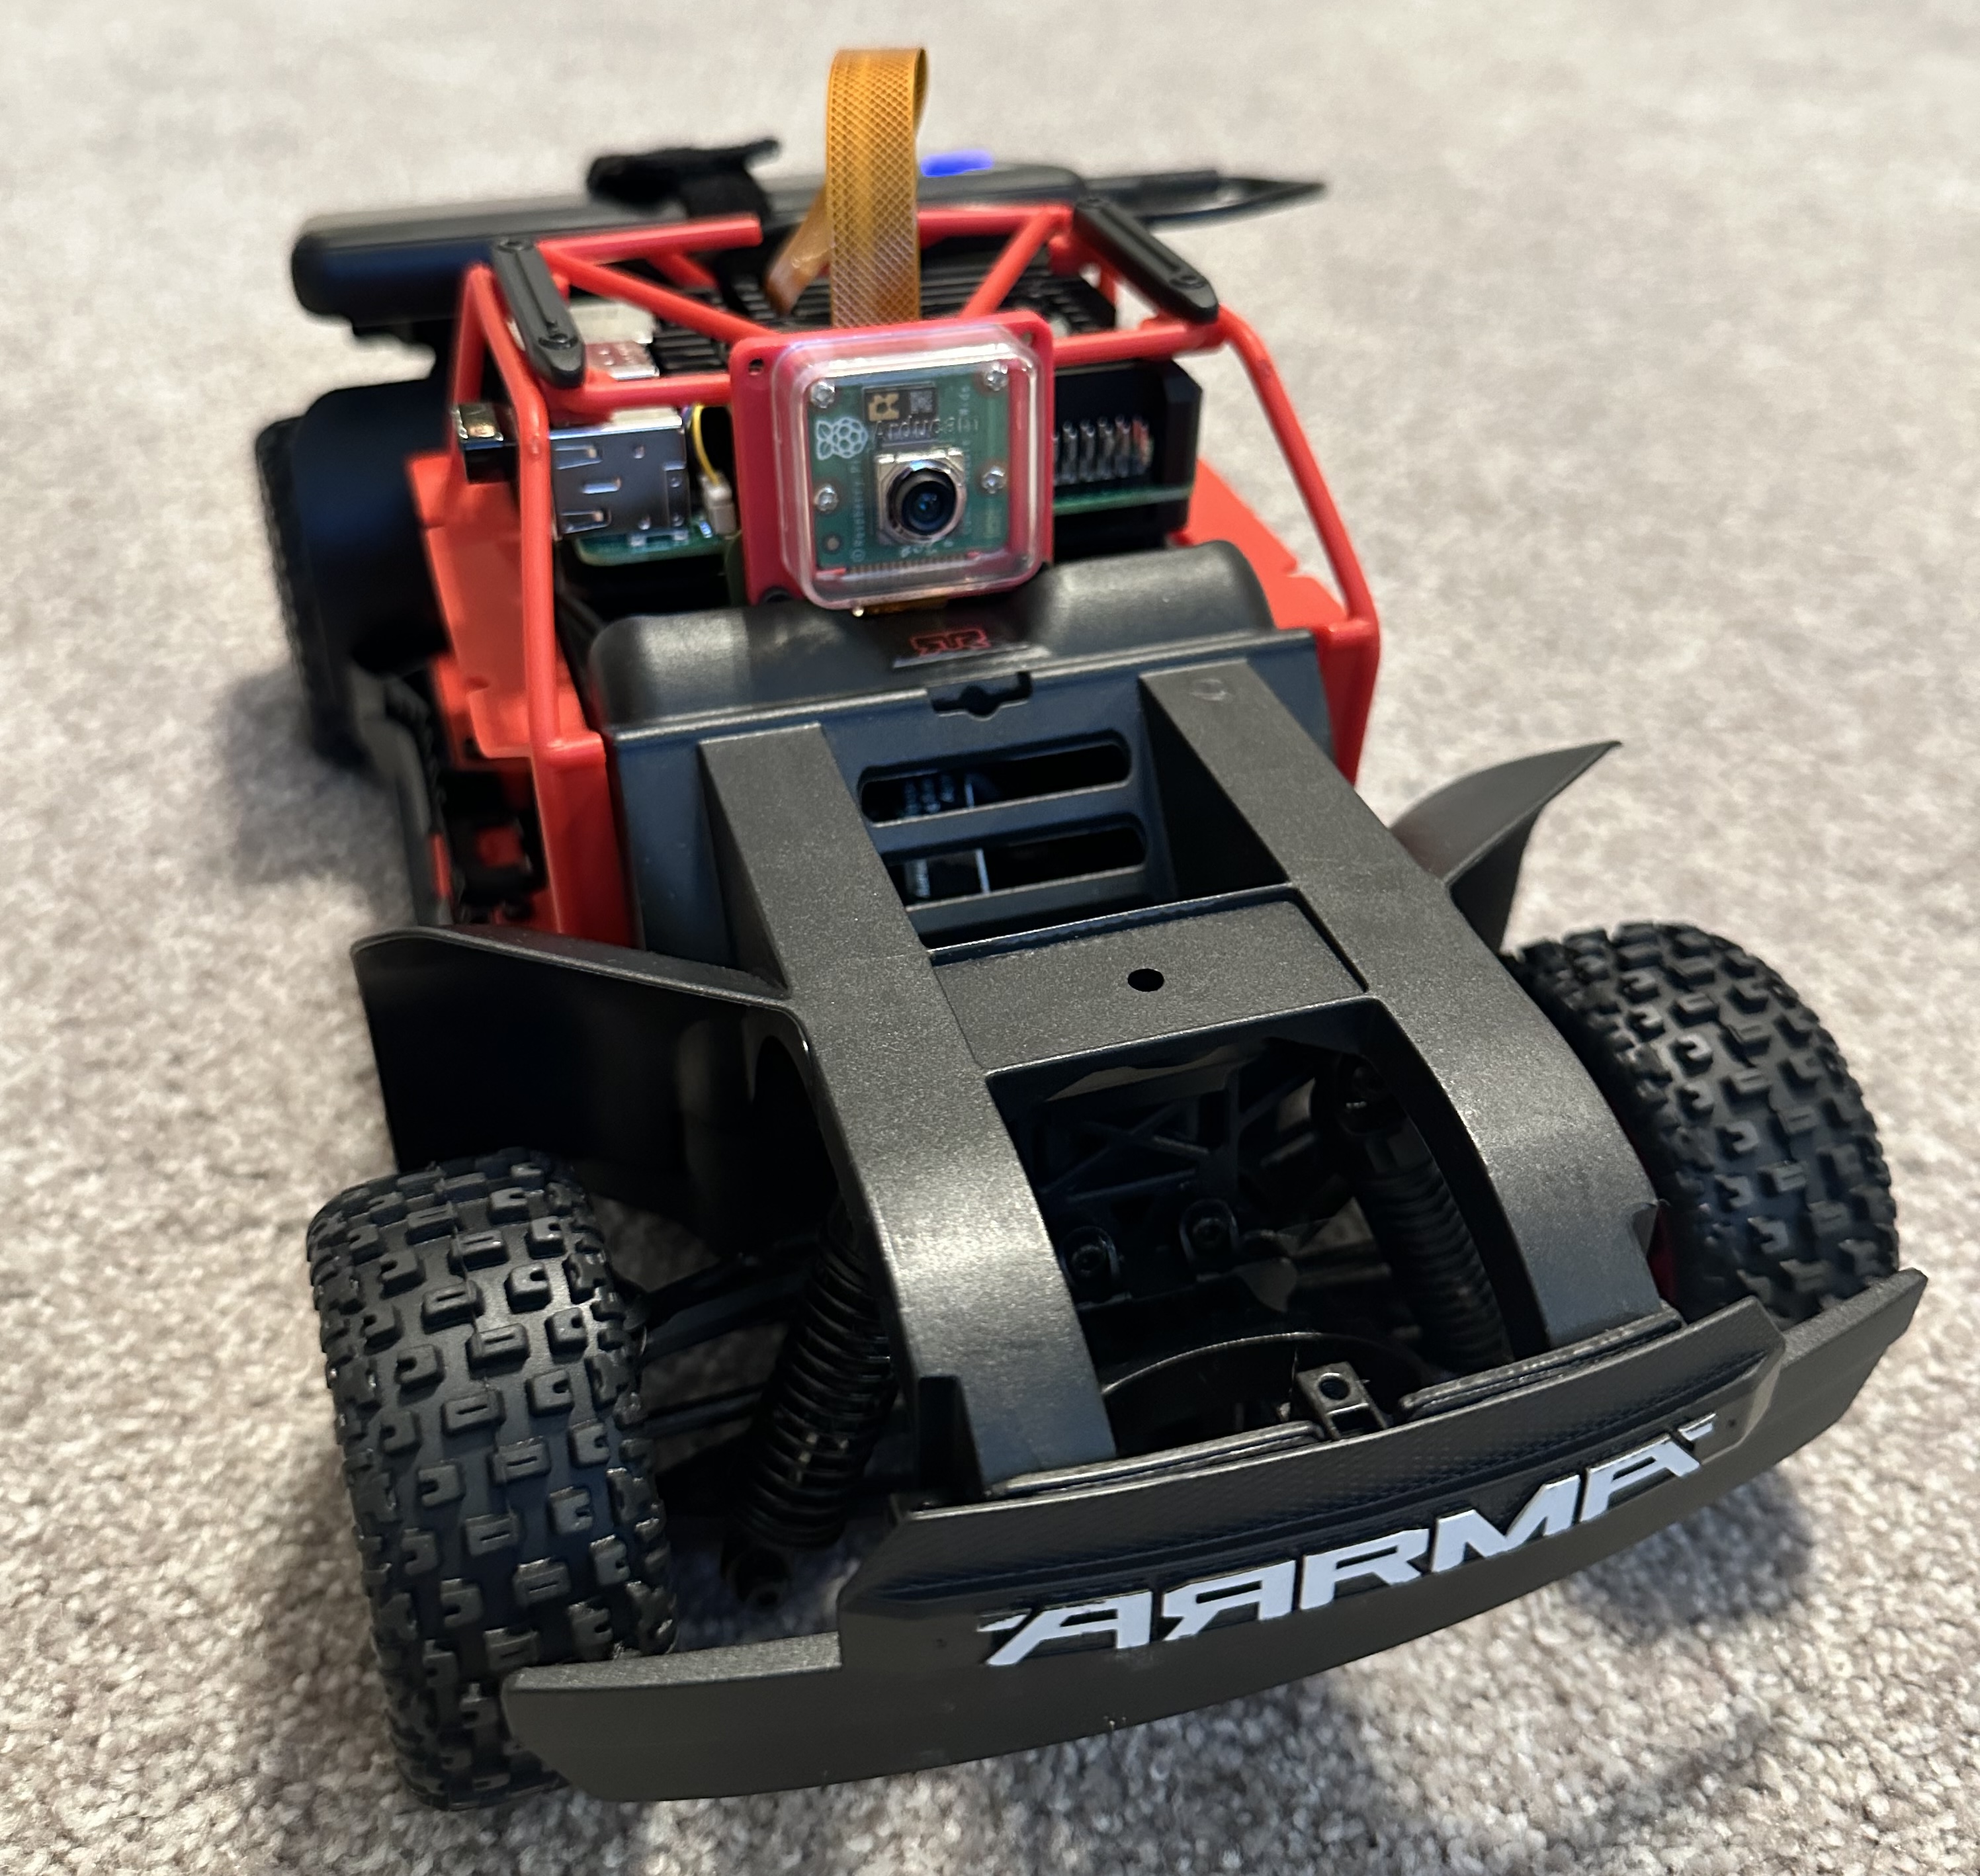
Raspberry Pi
I am using Raspberry Pi 5 with the Pi Camera 3 Wide. Raspberry Pi 5 is the latest generation of Pi with 3x the speed of the previous generation. The Camera 3 is also new, released in 2023, after seven years of long-awaited updates to the Camera 2. The Raspberry Pi and its camera can be purchased from Amazon or the PiShop. The Raspberry Pi 5’s camera port is 15 Pin, so be sure to get the ribbon cable with 15 Pin on one end and 22 Pin on the other.
The Raspberry Pi OS I installed is Debian version 12, nicknamed Bookworm. The OS is installed on the mini SD card using “Raspberry Pi Imager”. In the Imager, I chose “Raspberry Pi 5” as the “Raspberry Pi Device” option and “64-bit Raspberry Pi Desktop” for the “Operating System” drop-down.
Setup Pi Camera on the Raspberry Pi
Instructions on installing the Pi camera on the Raspberry Pi can be found here.
Once the camera is installed on Raspberry Pi, please start Raspberry Pi and run rpicam-hello command in the terminal to verify the connection is good. You can access the Raspberry Pi’s terminal through SSH or by connecting it with a monitor, keyboard, and mouse.
- If using SSH and seeing these printouts from the “rpicam-hello” command, the connection has been successful.
#0 (0.00 fps) exp 32680.00 ag 5.39 dg 1.37 #1 (30.01 fps) exp 32680.00 ag 5.39 dg 1.37 #2 (30.02 fps) exp 32680.00 ag 7.26 dg 1.01 ... - If in front of the Raspberry Pi monitor and see the camera preview stream displayed on the screen, it means the camera to Raspberry Pi’s connection is good.
If the camera cannot stream video, please check the ribbon cable connection and see if it faces the right direction.
Video Streaming
Now we have the camera configured to work with the Raspberry Pi, we are ready for video streaming. With video streaming, there are two popular options: UV4L and GStreamer. I tried both, and here are my observations:
UV4L is explicitly designed for Raspberry Pi and has a smaller user base. It is simpler to set up on the older version of Raspberry Pi for basic WebRTC streaming. I used UV4L on Raspberry Pi OS “Buster” for WebRTC streaming. However, UV4L does not work with the latest Raspberry Pi OS “Bookworm”. Installing UV4L on the latest Raspberry Pi OS leads to packaging errors.
GStreamer is highly flexible. Construct pipelines give the user precise control over video processing, encoding, and transmission. Therefore, GStreamer typically outperforms UV4L in complex video streaming and processing scenarios. GStreamer supports many protocols, has a large, active community, and is widely used across different platforms.
Therefore, the choice is obvious. We will use GStreamer to stream video from the RC truck.
Setup GStreamer on the Raspberry Pi
The Raspberry Pi comes preinstalled with Python 3.11. I will provide a Python script that constructs and runs a GStreamer pipeline to stream video using RTSP protocol. Before we can run that script, we need to install GStreamer plugins and dependent libraries.
# install gstreamer tools and core modules
sudo apt update
sudo apt install gstreamer1.0-tools gstreamer1.0-plugins-base gstreamer1.0-plugins-good gstreamer1.0-plugins-bad gstreamer1.0-plugins-ugly gstreamer1.0-libav
sudo apt install gstreamer1.0-plugins-base-apps v4l-utils

# install libcamera bits
sudo apt install libcamera-dev gstreamer1.0-libcamera

# install rtsp related libs
sudo apt install libgstrtspserver-1.0-dev
sudo apt install gstreamer1.0-rtsp
sudo apt install -y python3-gi python3-gi-cairo gir1.2-gtk-3.0 gir1.2-gst-rtsp-server-1.0
Start the RTSP Streaming Service on Raspberry Pi
SSH into the Raspberry Pi and create a folder called “streamer” in the pi user’s home directory. Create a Python scriptrtsp_server.py in the “streamer” folder. Please see below for the code:
#!/usr/bin/env python3
import gi
from gi.repository import GLib

gi.require_version('Gst', '1.0')
gi.require_version('GstRtspServer', '1.0')
from gi.repository import Gst, GstRtspServer

class RTSPServer:
    def __init__(self):
        Gst.init(None)
        # Gst.debug_set_default_threshold(3)
        self.server = GstRtspServer.RTSPServer()
        self.factory = GstRtspServer.RTSPMediaFactory()
        self.factory.set_launch("libcamerasrc ! video/x-raw,format=YUY2,width=640,height=480,framerate=30/1 ! videoconvert ! x264enc tune=zerolatency speed-preset=ultrafast ! rtph264pay name=pay0 pt=96")
        self.factory.set_shared(True)
        self.server.get_mount_points().add_factory("/stream", self.factory)
        self.server.attach(None)

    def run(self):
        print("RTSP server is running on rtsp://localhost:8554/stream")
        loop = GLib.MainLoop()
        loop.run()

if __name__ == "__main__":
    server = RTSPServer()
    server.run()
To start the RTSP service on the RC truck, type the command python rtsp_server.py on the Raspberry Pi, for example:
$ python rtsp_server.py
RTSP server is running on rtsp://localhost:8554/stream
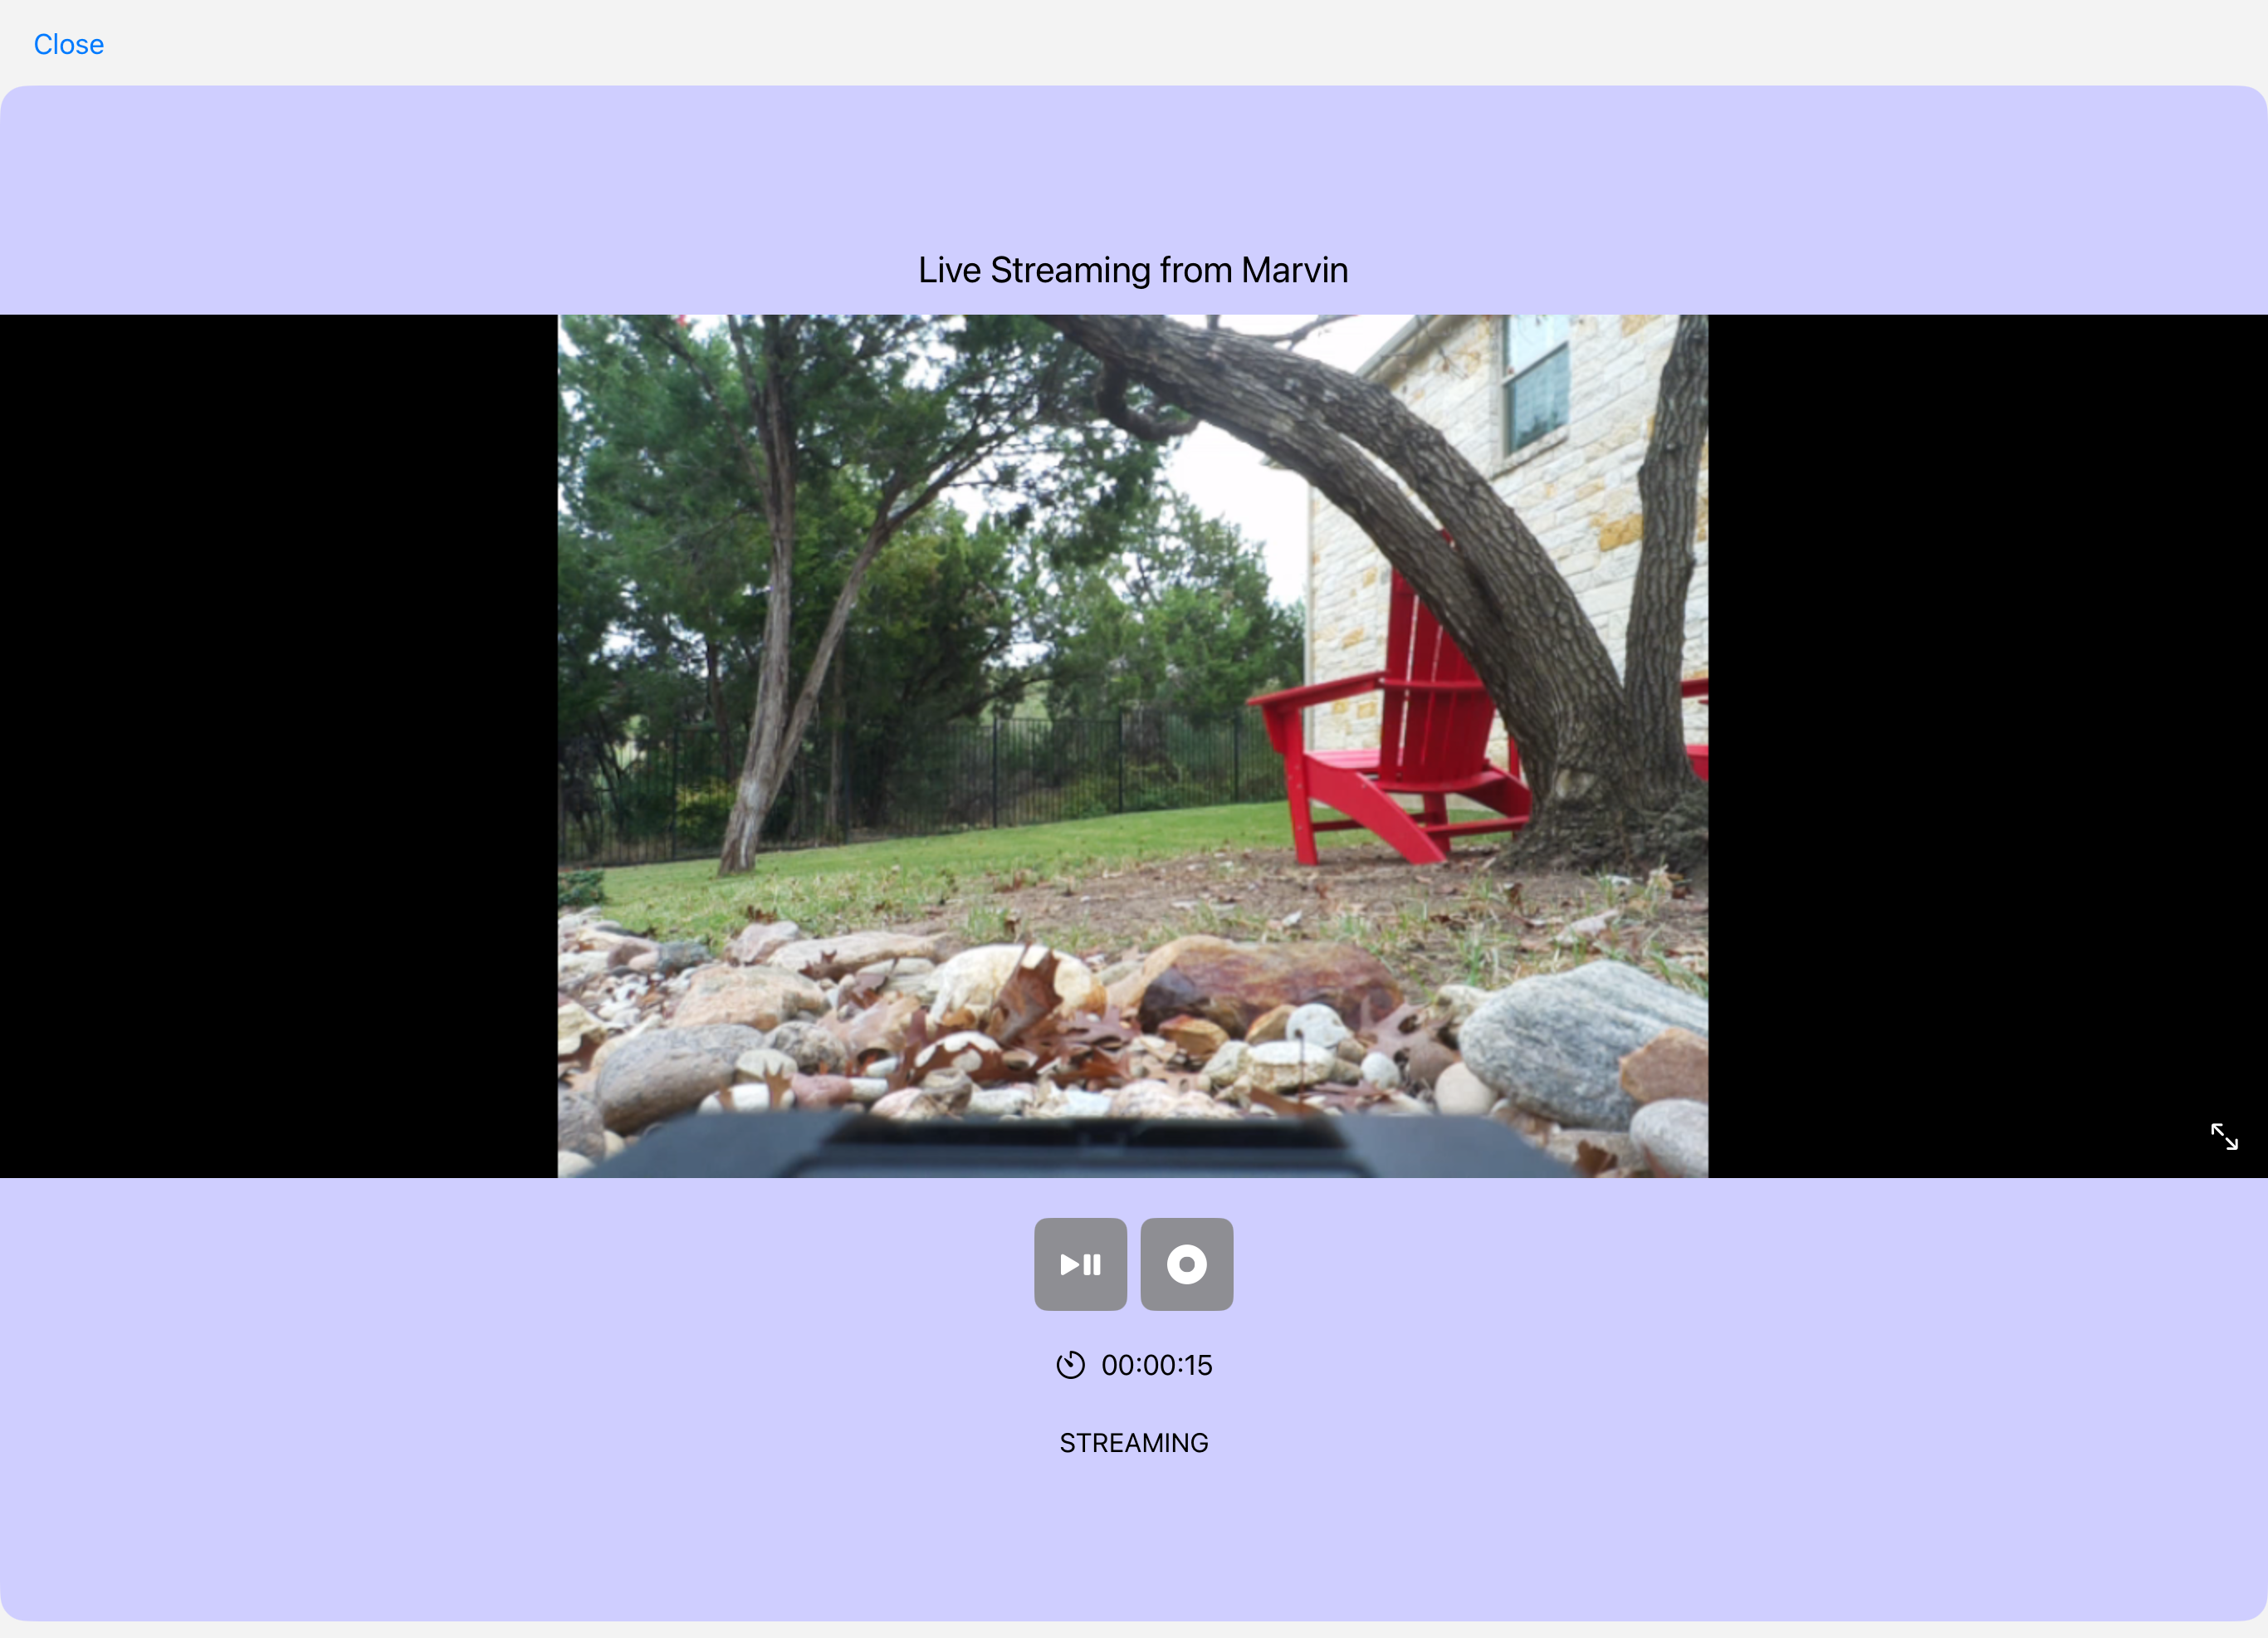
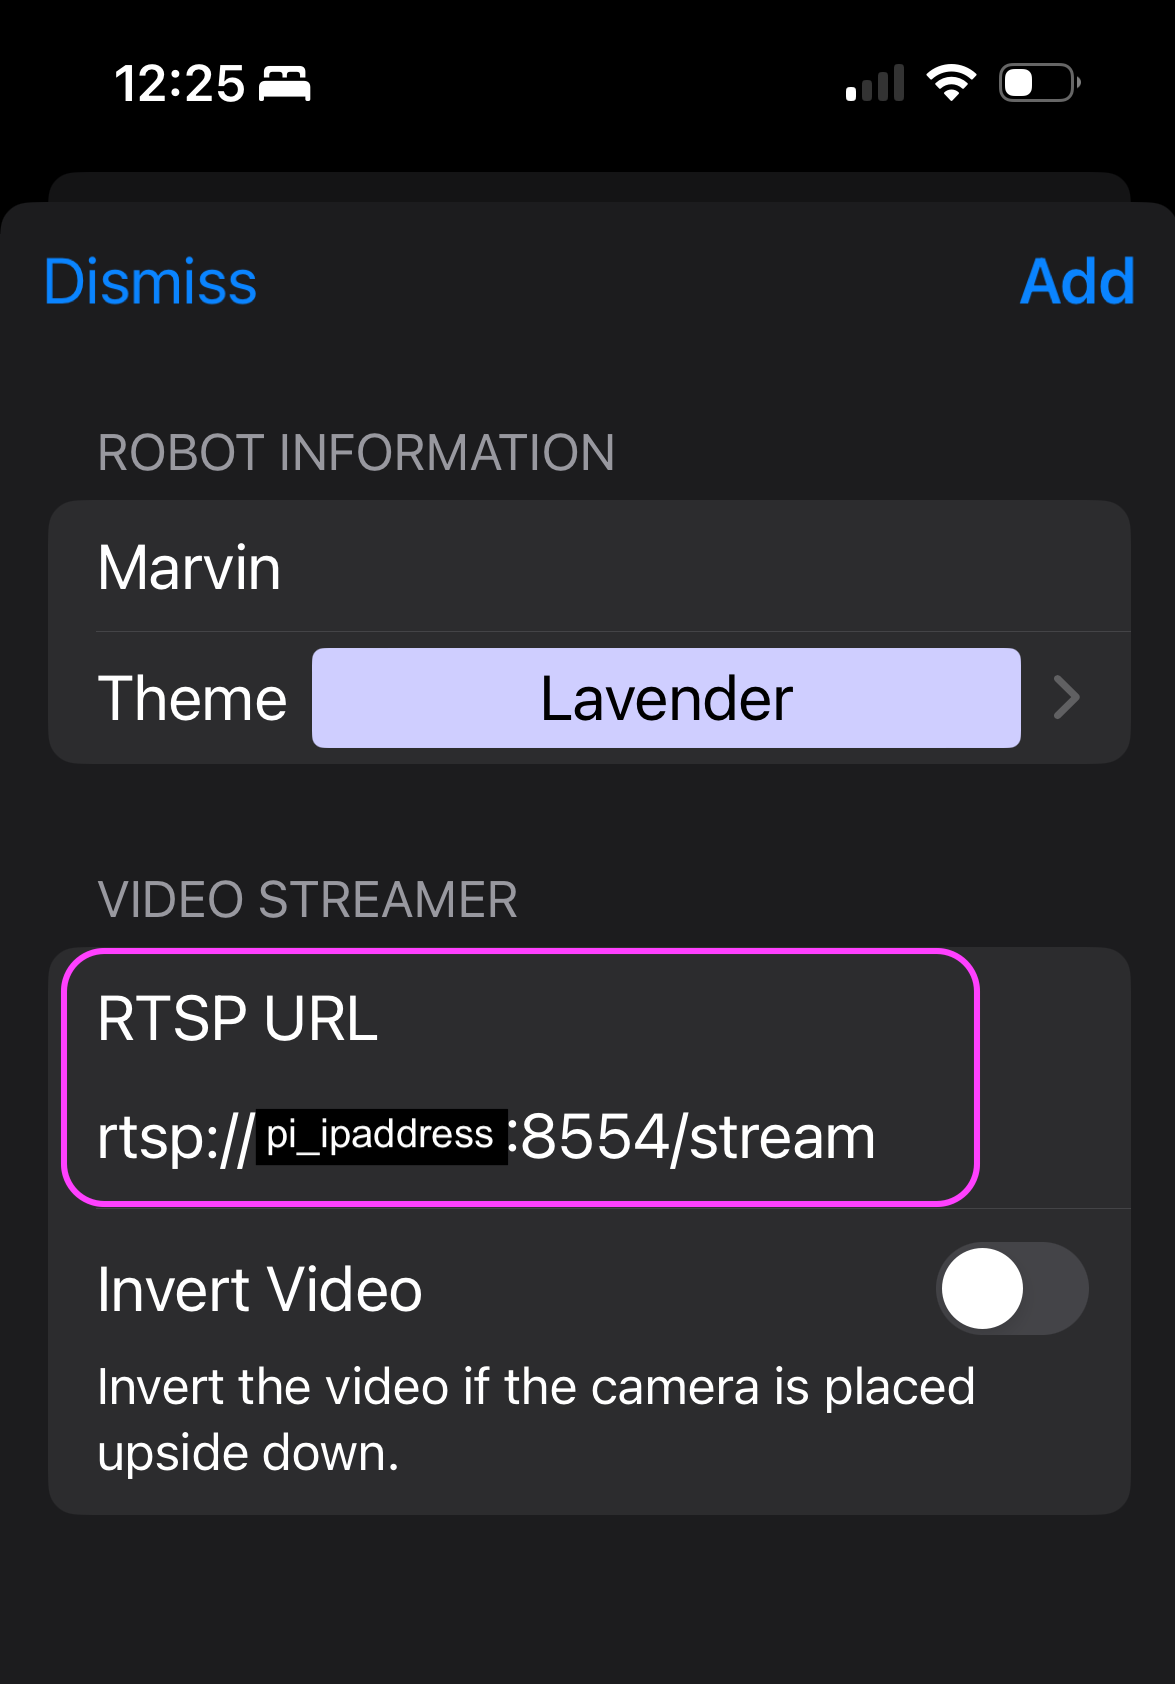
Use the Droid Vision App
To view the RC truck’s video stream in the Droid Vision app, open the app, click the Settings button. Give the robot a name and its RTSP URL, which is:
rtsp://<your_raspberry_pi_ipaddress>:8554/stream
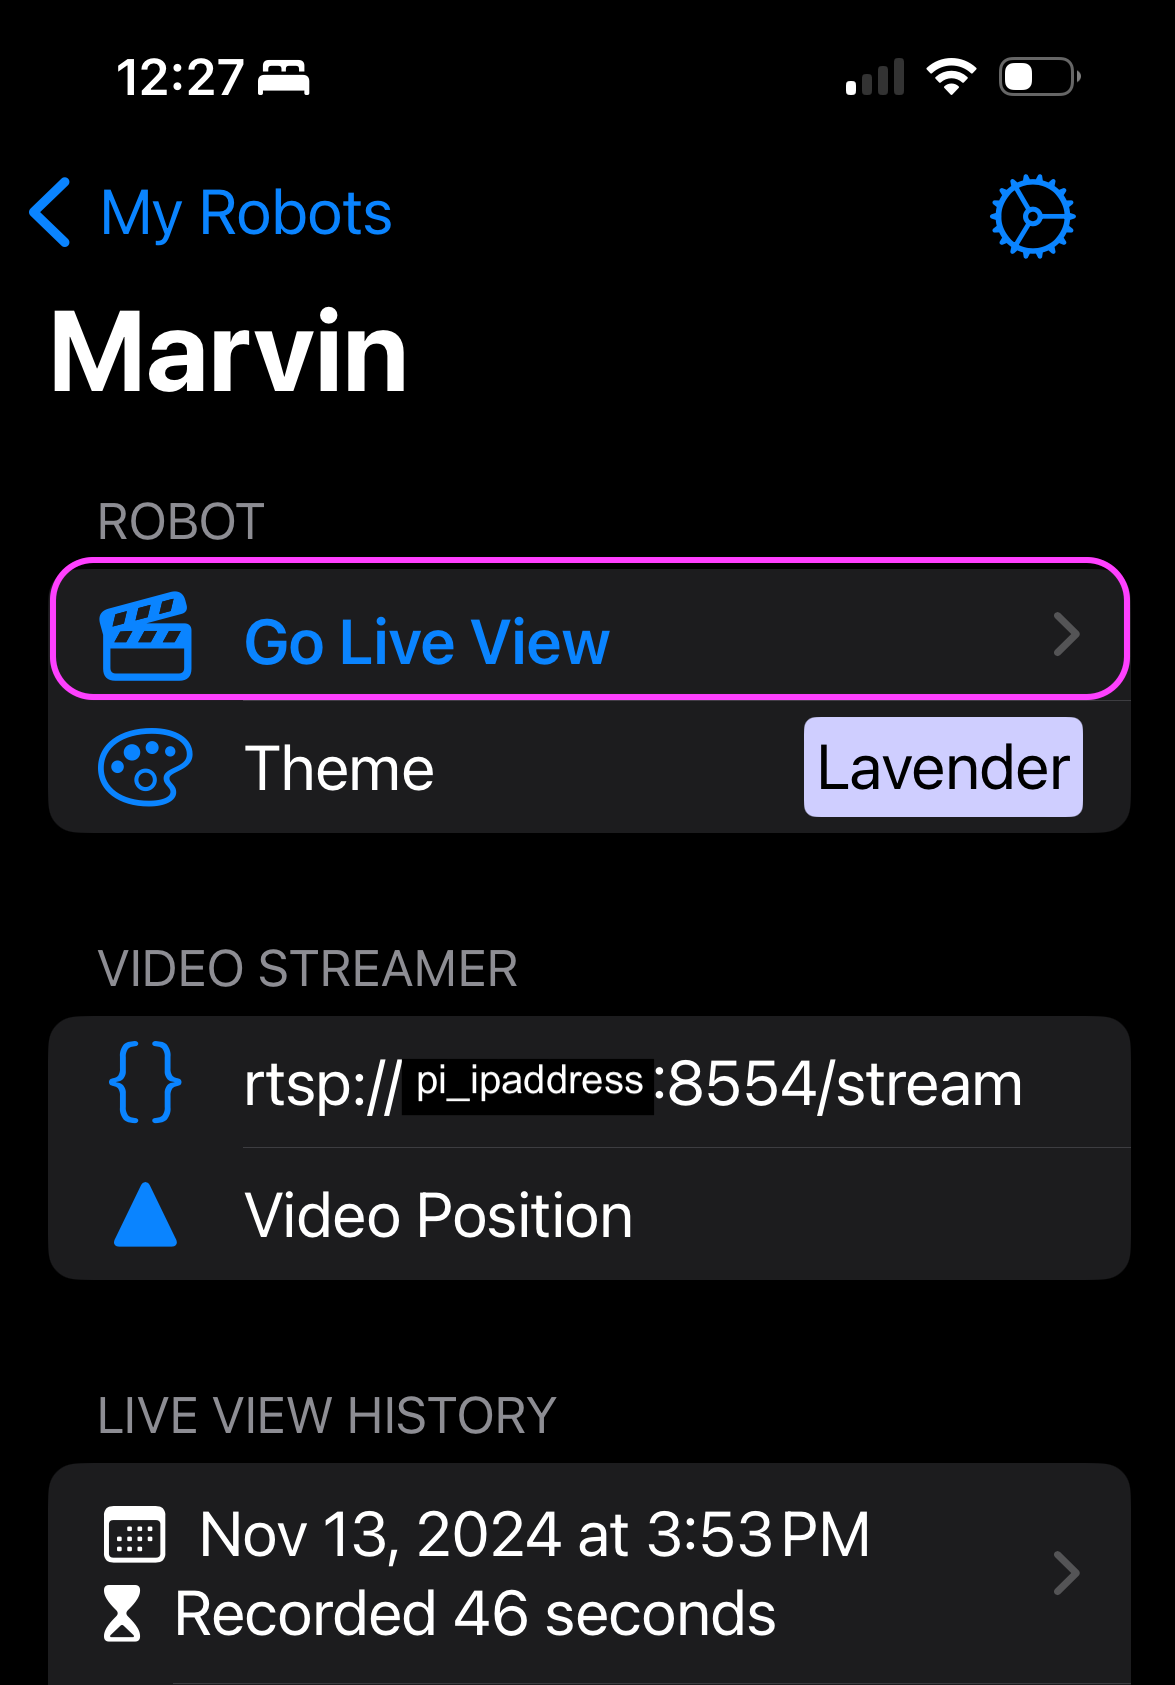
After saving the settings, tap “Go Live View” to see the robot’s live view on the device.
The RTSP server terminal window will print out the following messages:
[0:14:25.171703990] [2040]  INFO Camera camera_manager.cpp:316 libcamera v0.3.1+74-a65f44f4-dirty (2024-09-09T08:55:36BST)
[0:14:25.181487052] [2041]  INFO RPI pisp.cpp:695 libpisp version v1.0.7 28196ed6edcf 29-08-2024 (16:33:32)
[0:14:25.195305488] [2041]  INFO RPI pisp.cpp:1155 Registered camera /base/axi/pcie@120000/rp1/i2c@80000/imx708@1a to CFE device /dev/media0 and ISP device /dev/media1 using PiSP variant BCM2712_C0
[0:14:25.198211593] [2044]  INFO Camera camera.cpp:1191 configuring streams: (0) 640x480-YUYV
[0:14:25.198383912] [2041]  INFO RPI pisp.cpp:1451 Sensor: /base/axi/pcie@120000/rp1/i2c@80000/imx708@1a - Selected sensor format: 1536x864-SBGGR10_1X10 - Selected CFE format: 1536x864-PC1B
...
For detailed step-by-step video tutorial, please check out my another blog post Droid Vision Tutorial
Tap the record button next to the play/pause button to record the live stream video.