Robot Auto Mapping using Nav2 SLAM Toolbox
I am always curious about how the Roomba vacuum automatically creates a map of the floor by driving around. In this blog, I will explain how to create the floor map using a mobile robot with the Nav2 SLAM Toolbox.
Get to Know the SLAM Toolbox
The Nav2 (Navigation 2) stack is a modular system that enables autonomous navigation for mobile robots in the ROS framework. The SLAM Toolbox, which stands for Simultaneous Localization and Mapping, plays a crucial role in the navigation stack and is part of ROS Navigation 2.
The SLAM Toolbox is a 2D mapping and localization system based on LiDAR data and odometry. It is the first two steps of the Nav2 pipeline, which are:
- Mapping: generating and publishing the map of the environment
- Localization: using the saved map to localize the robot in the known environment
- Planning: computing the path from the current pose to the goal
- Control: following the path using velocity commands
- Recovery: handling failure conditions, such as scenarios where the robot gets stuck
Mapping
The SLAM Toolbox enables the robot to generate a map of an unknown environment while tracking its position on that map in real time. SLAM Toolbox builds a 2D occupancy grid map using the robot’s laser scans and motion data.
Here is the kitchen map created by my robot, R4, as it circled the kitchen using the Droid Vision app.
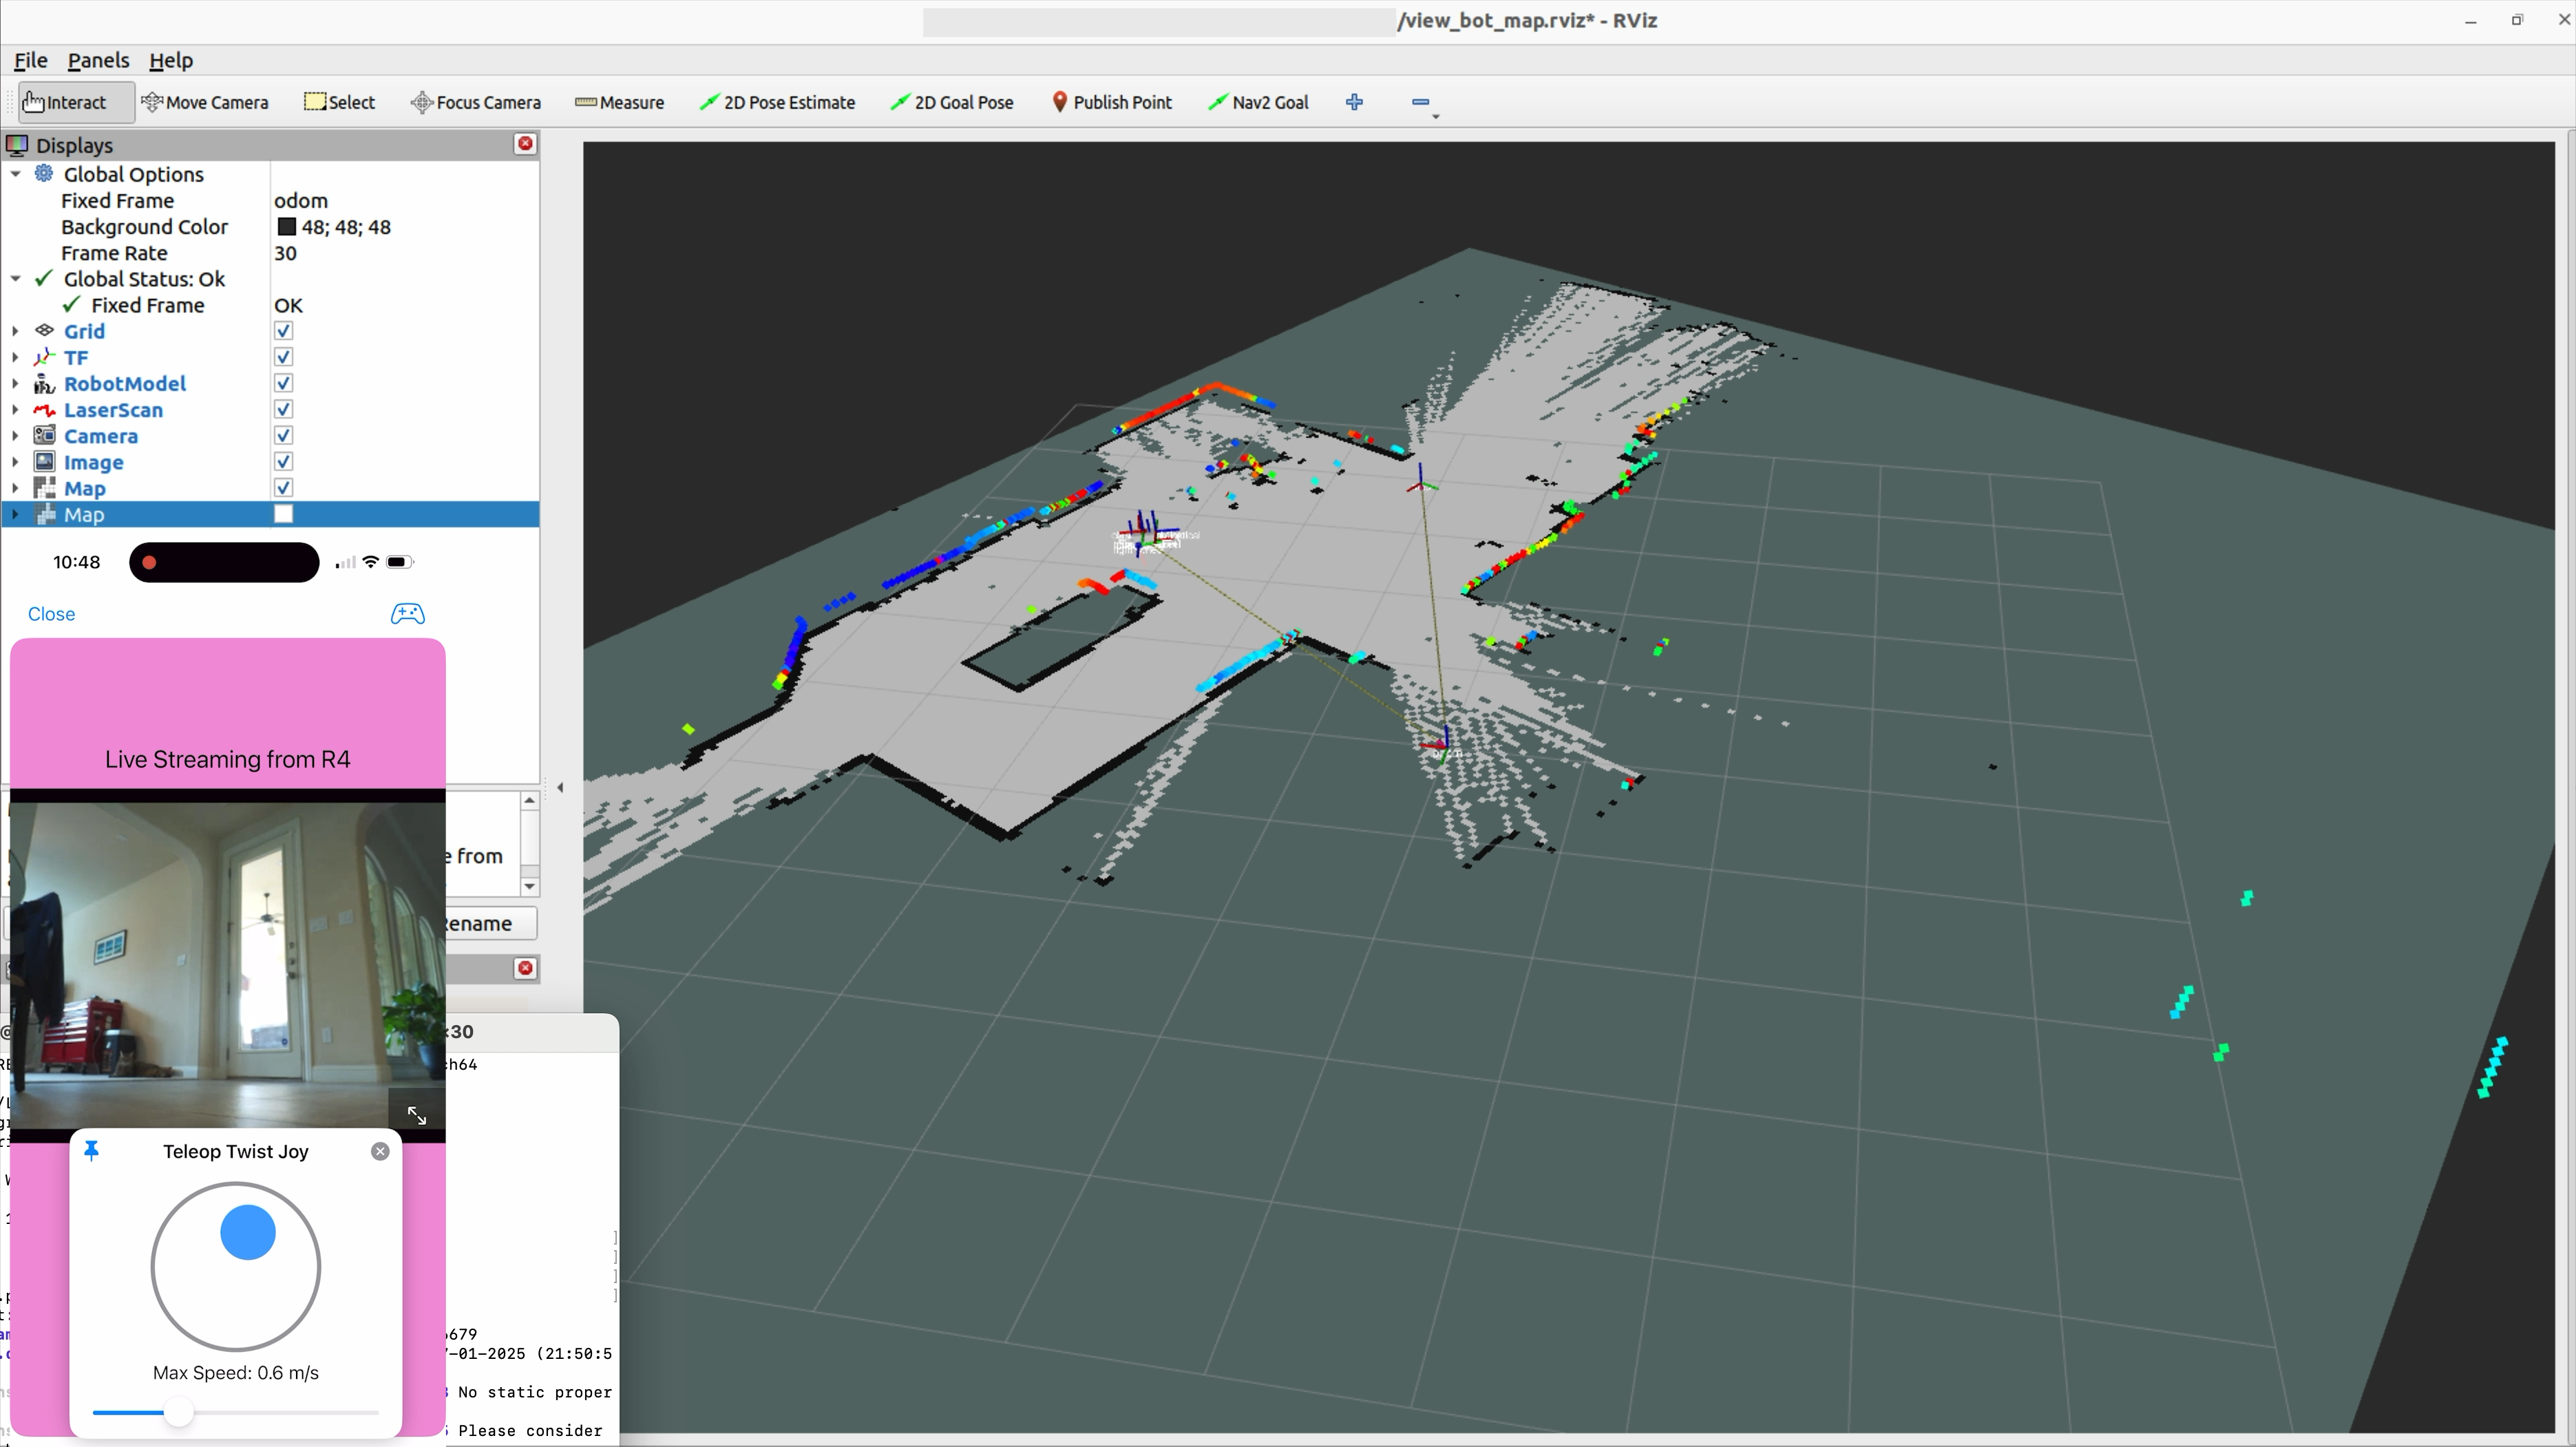
The tool that displays the map is RViz2, which is a 3D visualization tool within the ROS 2 framework. RViz2 enables users to view and interact with a robot’s state, sensor data, and environment in a 3D space. It provides a window into the robot’s world, illustrating what the robot “sees” and how it is positioned.
The generated map can be saved in RViz2 using the “slam_toolbox” panel. This panel contains the “save” and “serialization” options, where the “serialization” format is intended for use by the SLAM Toolbox itself, while the “save” format allows the map to be utilized by other Nav2 localization tools, such as Adaptive Monte Carlo Localization (AMCL).
Mapping is the first step of the navigation pipeline, and SLAM Toolbox plays a crucial role in map generation.
Localization
The SLAM Toolbox is also a localization system that identifies the robot’s position and orientation (pose) within its perceived world.
To explain the concept of “Localization” in ROS, we must discuss the ROS Frame and Transform.
Frame
- A Frame refers to a 3D coordinate system used to define the spatial location and orientation of an entity (like a robot, sensor, or object) in space.
- The odom Frame is the starting point of the robot’s trajectory. As the robot moves, its pose changes in the odom frame based on odometry data.
- The base_link Frame is a fixed frame attached to the robot’s chassis or main body. It serves as a reference point for other robot frames, such as wheels and lidar sensors.
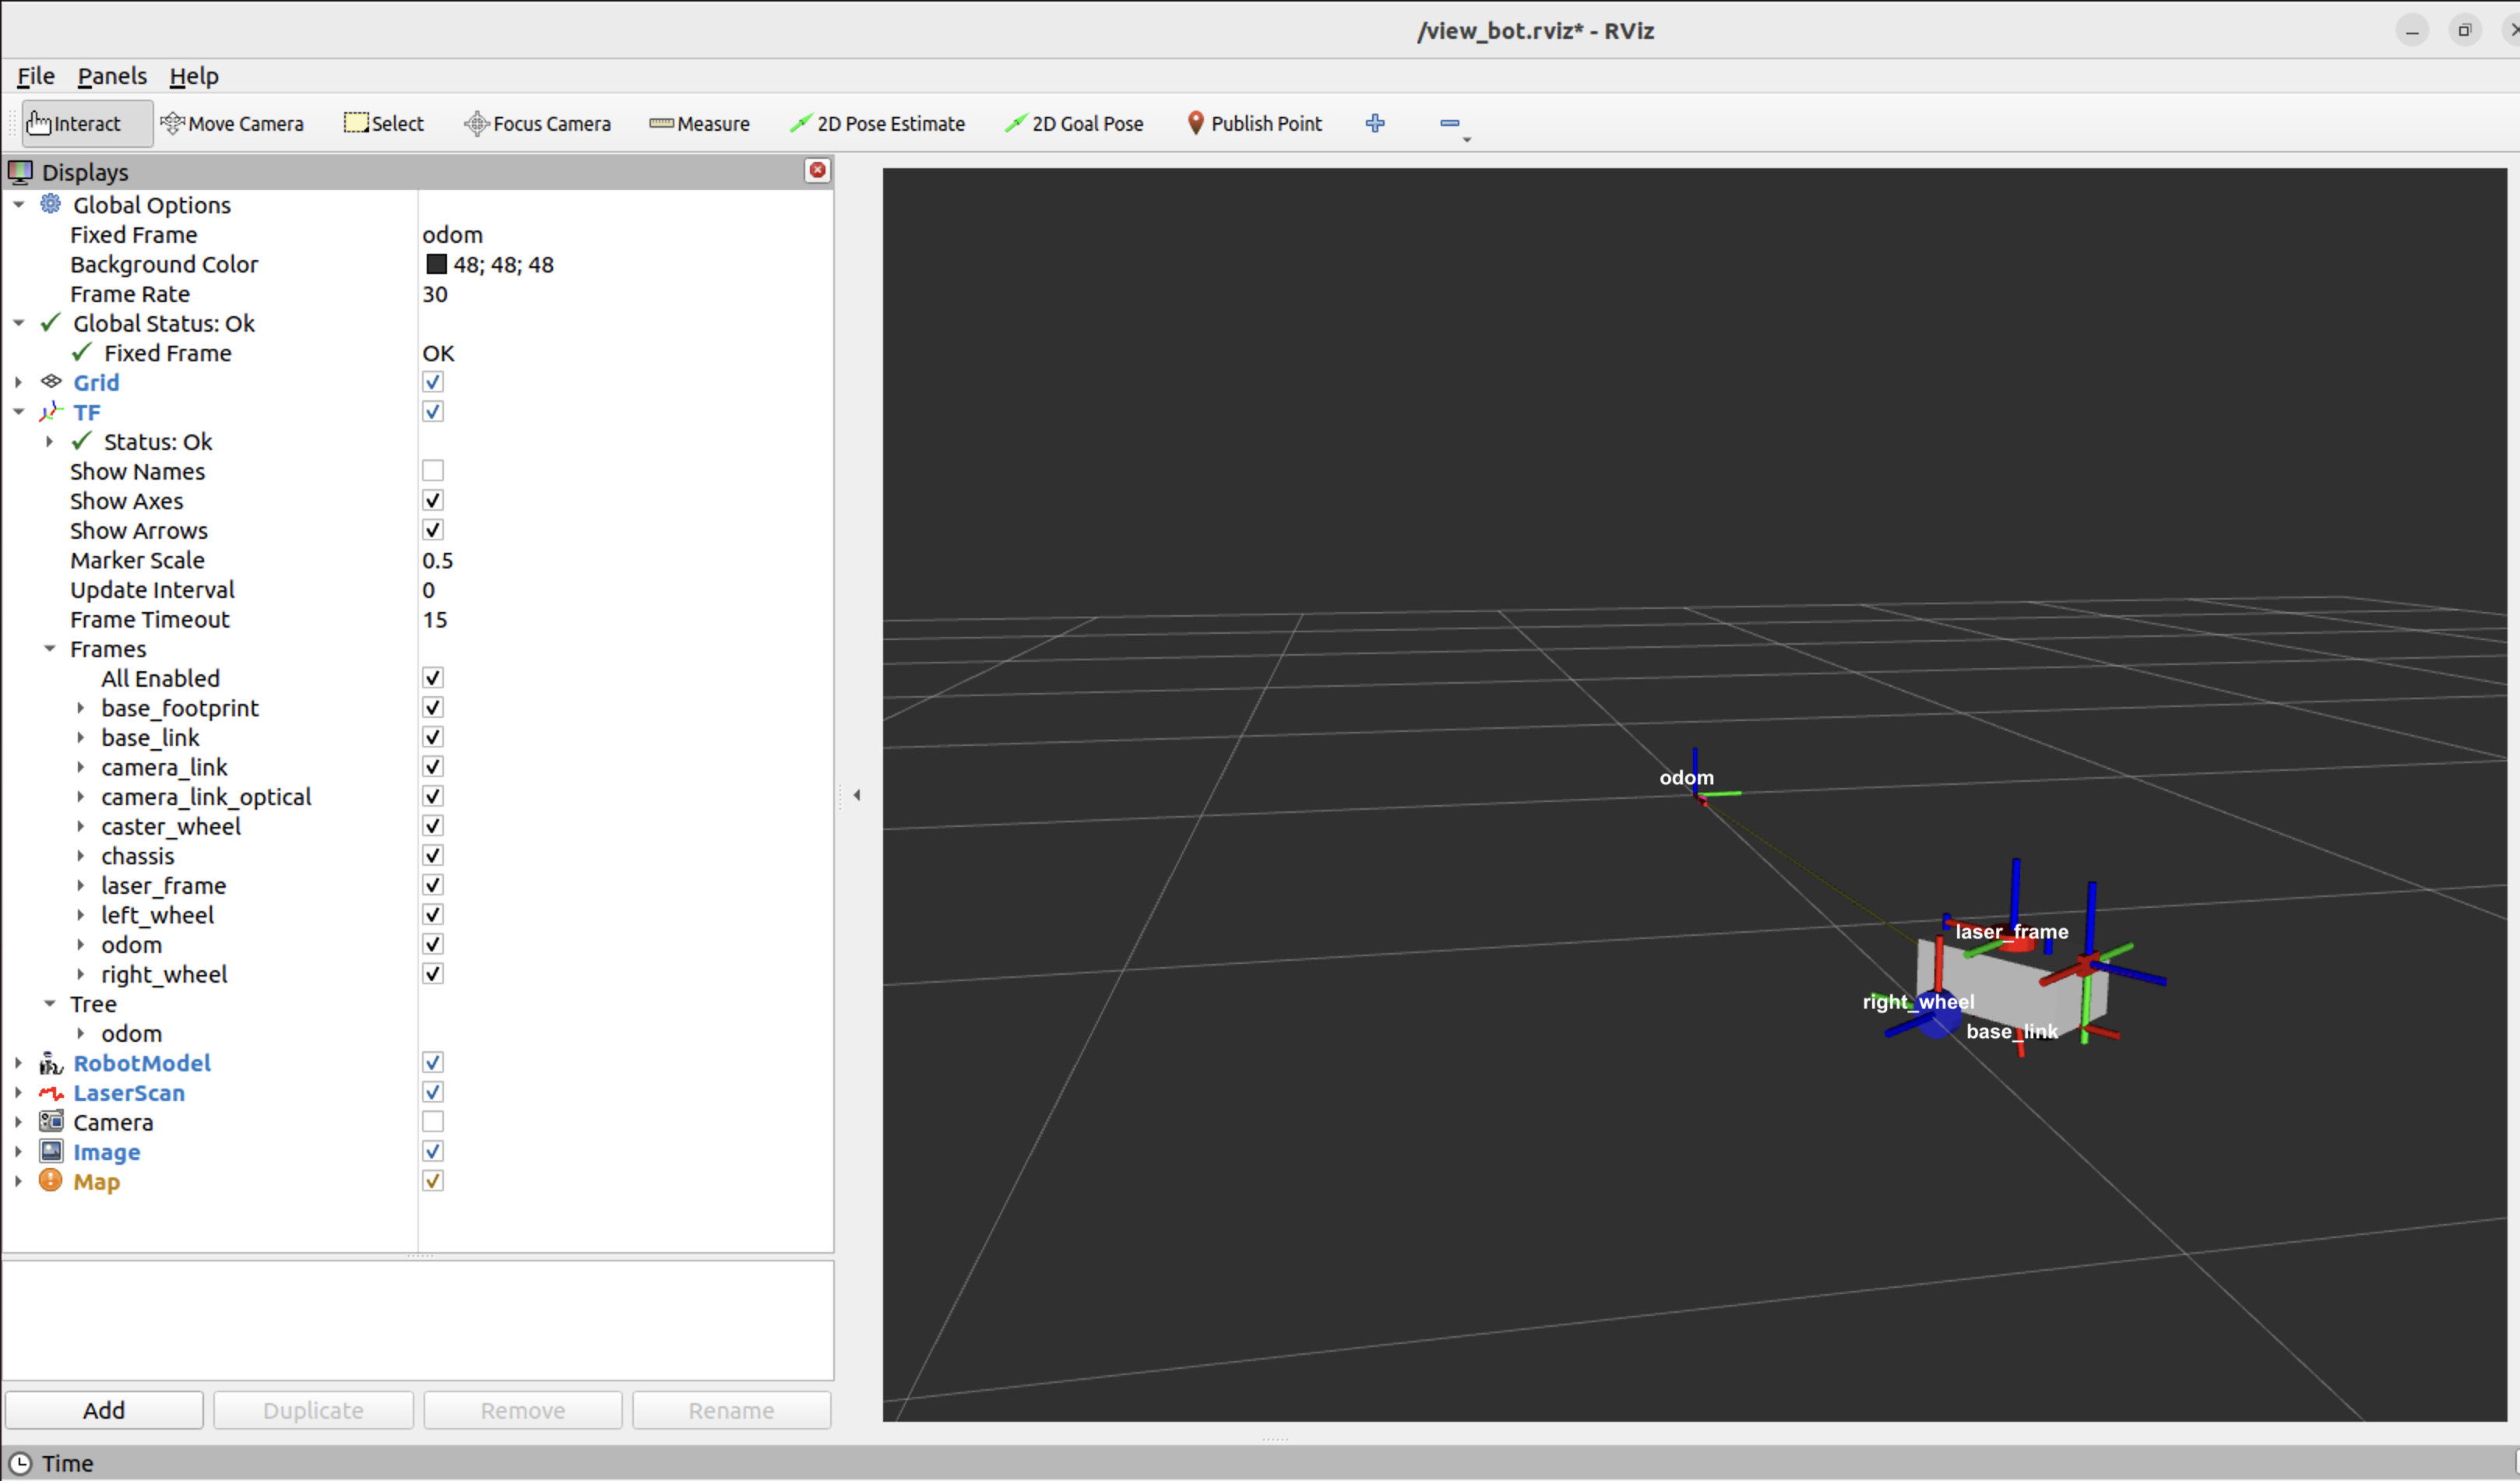
The ROS coordinate frame follows the Right-Hand Rule, where X goes forward from the robot’s center, Y goes to the left, and Z rises upward, perpendicular to the floor.
Here are the frames of my mobile robot, as seen in RViz, with red representing the X-axis, green representing the Y-axis, and blue representing the Z-axis. Every joint defined in the robot’s URDF has a frame.
Transform chain
What is Transform in ROS?
- Transform(TF) represents the position and orientation of a coordinate frame relative to another. It’s a fundamental concept in ROS that describes how objects and coordinate systems are positioned in 3D space, enabling systems to understand the relative positions of various components and their interactions.
A typical Transform chain for mobile robots looks like this:
map → odom → base_link → laser_frame
Each transform has a purpose:
-
The odom → base_link comes from the wheel encoder or other local sensors. It tracks how far the robot has moved from its starting point. It is fast to compute, continuous but accumulates drift over time.
To correct for odometry drift, a higher-level system like SLAM Toolbox computes the robot’s true global pose and broadcasts. -
The map → odom comes from the SLAM Toolbox and provides global correction to the drifting odometry.
The SLAM Toolbox estimates the robot’s pose in the global map frame based on laser scans and odometry data. It uses this information to compute a correction transform and broadcasts it as the map → odom transform. This allows the robot’s current global position to be determined as base_link in the map frame.
The “map → odom” transform is essential for:
- RViz visualization: the robot appears in the correct position on the map.
- Path planning: the global planners can compute paths from the robot’s actual location.
- Localization: the robot can recognize when it returns to a previously visited location, known as loop closure.
In summary, the SLAM Toolbox broadcasts the map → odom transform to anchor the robot’s local odometry in the global map frame. This corrects for drift and ensures accurate global navigation. Without this transform, Nav2 cannot correctly localize the robot or plan valid paths.
With the SLAM Toolbox for mapping and localization, the navigation server performs the remaining steps of planning, control, and recovery in the navigation pipeline.
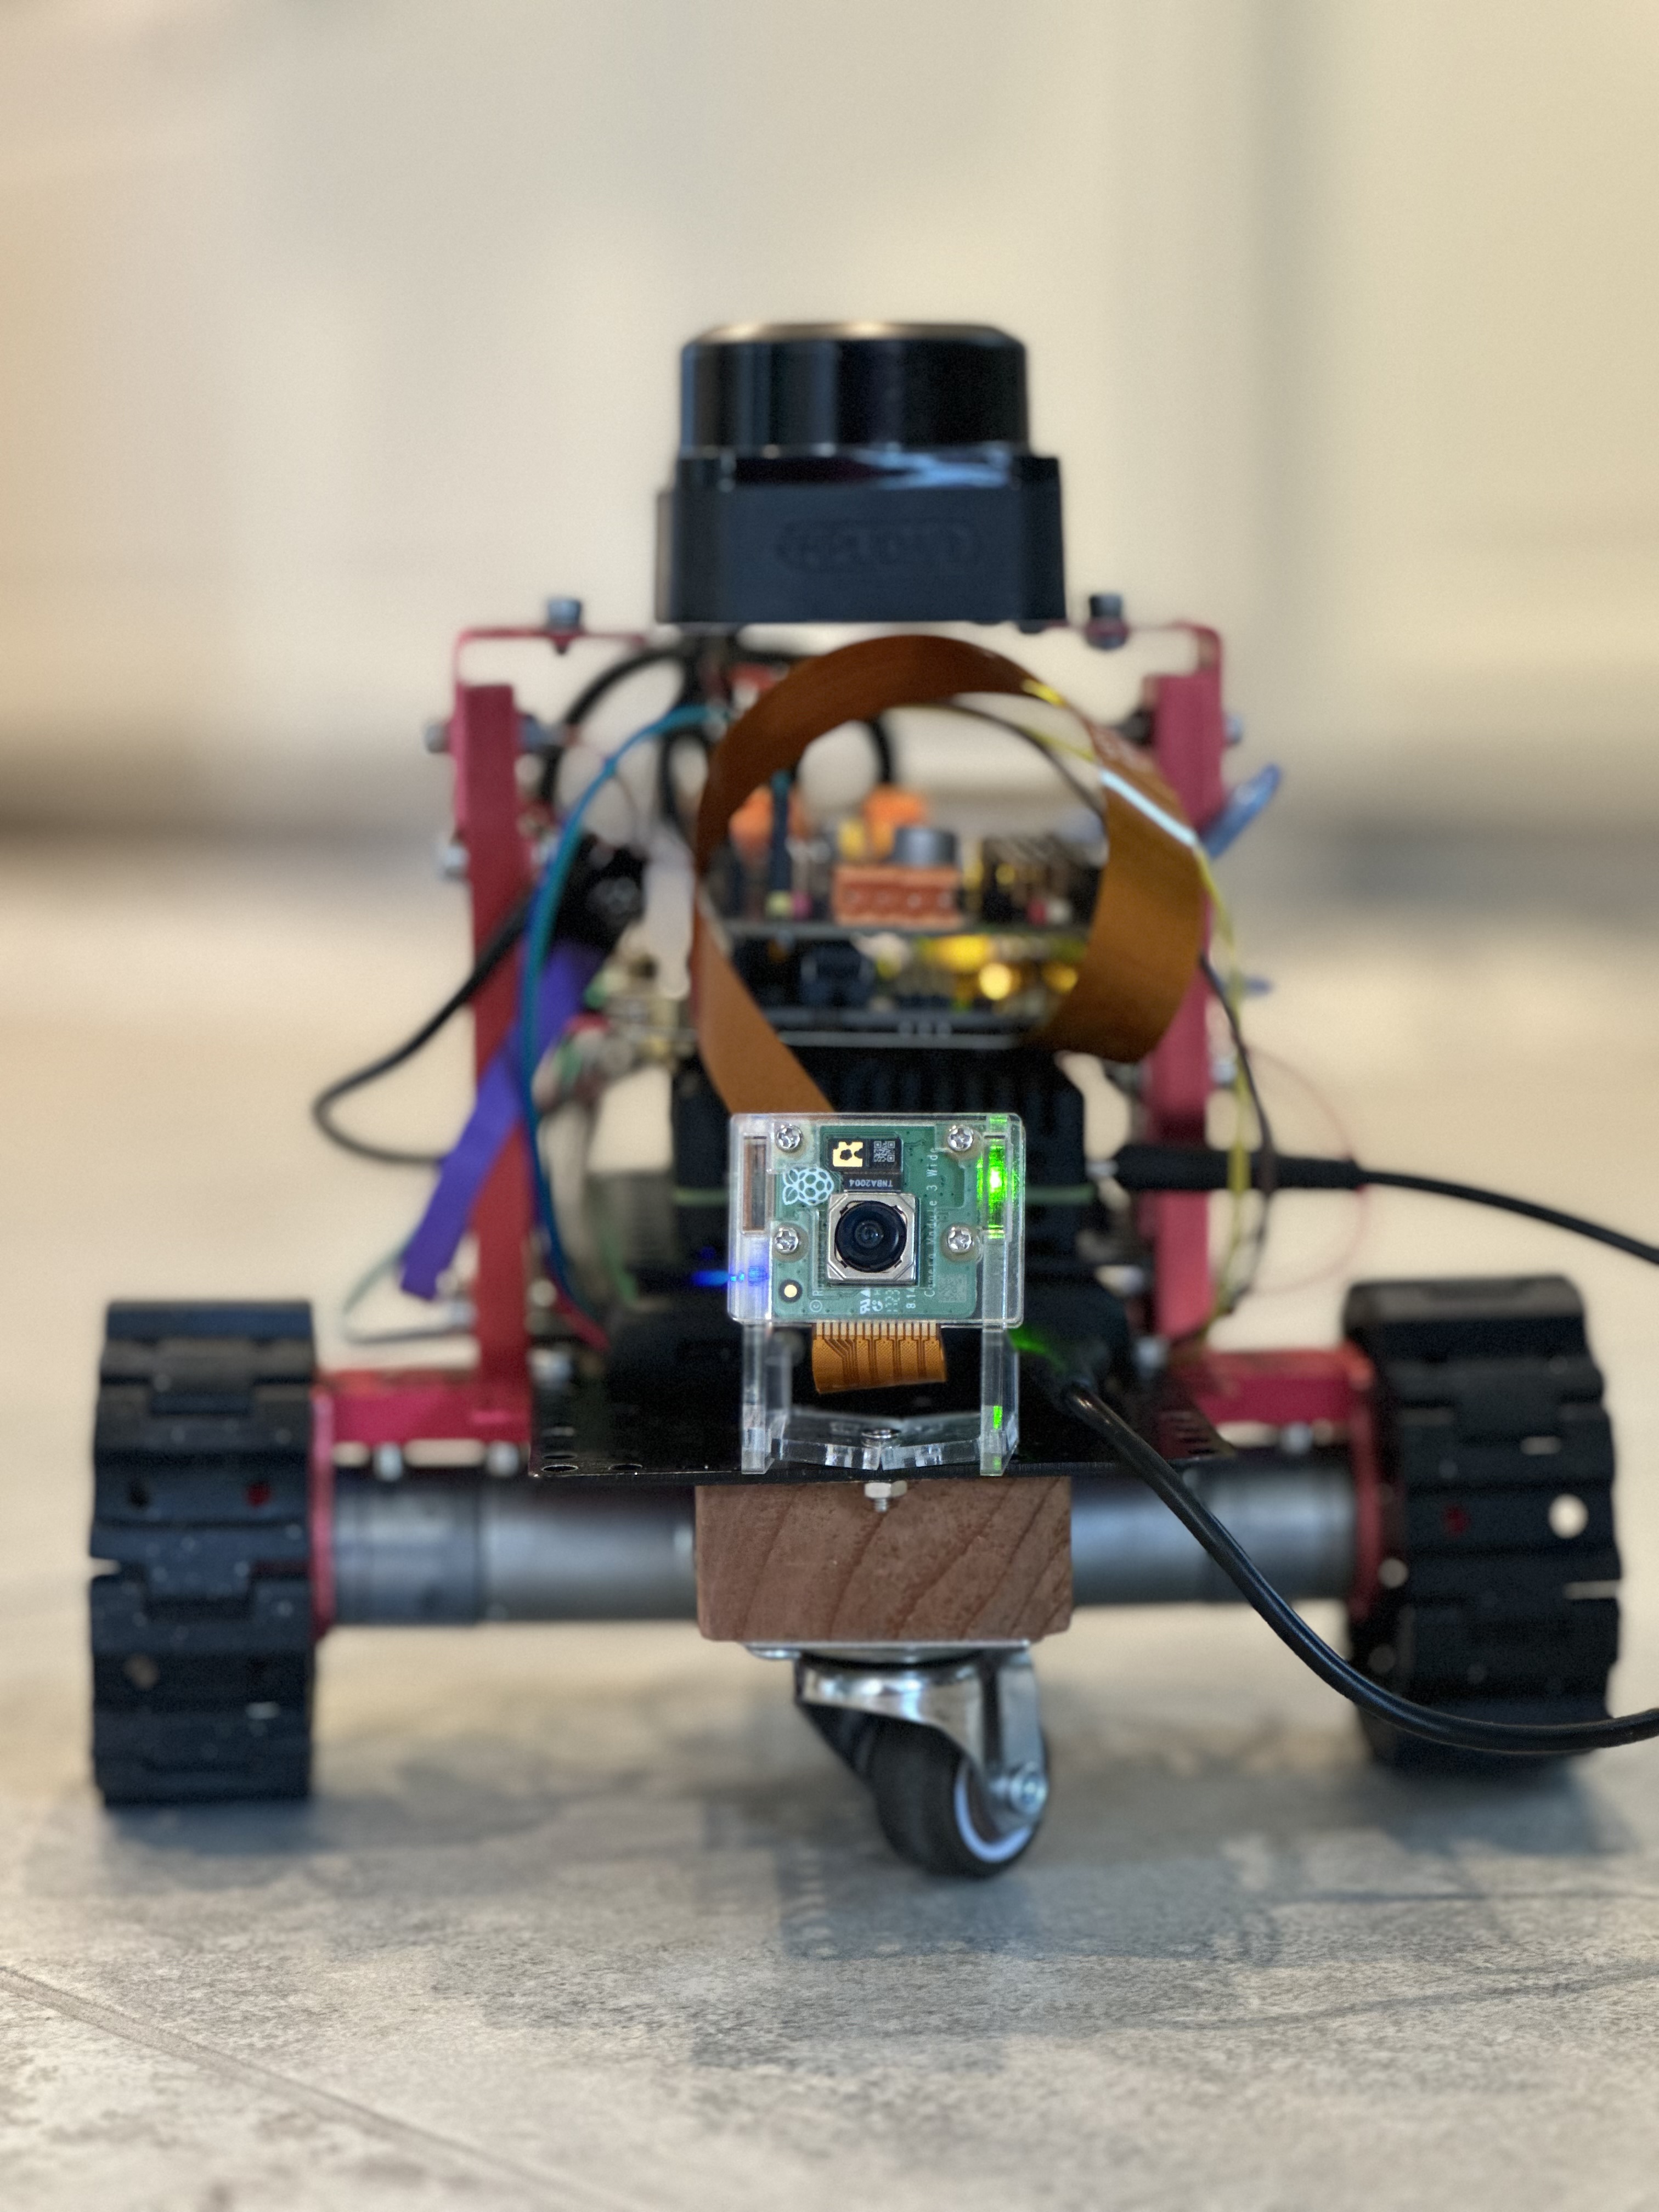
Meet Robot R4
This is my Differential Mobile Robot featuring two independently driven wheels and two caster wheels for balance. The Differential Bot moves forward or backward by rotating both wheels in the same direction, and it can rotate in place by spinning the wheels in opposite directions.
At the top of the robot is the RPLidar, which generates the scan data. I have a blog RPLidar in ROS 2 Docker on Raspberry Pi that details how to configure and run the Lidar nodes on a real robot. Please check that out.
Robot Mapping
To run the robot that generates maps, we need a ROS environment that includes the robot module, the RPLidar driver, the navigation stack, the rosbridge suite, and many other dependencies. The most straightforward approach is to use a Docker container. Docker simplifies deployment and makes the environment portable, consistent, and shareable.
A Docker Container
A Docker container is created from a Docker image, which serves as a template defining its structure and dependencies. Docker is widely used in enterprise software’s microservice architecture, but is relatively new in robotic applications. I have a blog, RPLidar in ROS 2 Docker on Raspberry Pi, which explains in detail how to use a Docker container in a robot.
The Dockerfile I prepared for my robot can be downloaded from here: Dockerfile and requirements.txt. The Docker image created from the Dockerfile includes all the necessary ROS 2 modules, Python libraries, and source code repositories. Access to the private Git repository is granted using an SSL key.
We can build the Docker image and start the Docker container using the following commands. Building the Docker image compiles the source code and creates the bot environment. You only need to build the image once and can reuse it to start the Docker container whenever needed.
# build the docker image "my_bot_image"
docker build -t my_bot_image .

# start the docker container from the image
docker run -it --network=host --ipc=host -v /dev:/dev \
    --device-cgroup-rule='c 188:* rmw' \
    --device-cgroup-rule='c 166:* rmw' \
    my_bot_image
Commands to Run the Robot Mapping
I launch the robot, the PRLidar, and the SLAM toolbox in the Raspberry Pi’s Docker container.
Additionally, I start the “rosbridge_server” because I use the Droid Vision app to view and control my robot remotely from my phone. Please see the article Droid Vision with built-in Joystick and Keypad for more information. If you prefer the traditional ROS teleop_twist_keyboard or teleop_twist_joy for remote control, feel free to use those and skip launching the rosbridge_server.
# 1. Start the robot itself
ros2 launch my_bot robot.launch.py

# 2. Start the robot's LiDAR scan
ros2 launch rplidar_ros rplidar_c1_launch.py serial_port:=/dev/ttyUSB0 frame_id:=laser_frame

# 3. Start the slam toolbox to create the map
ros2 launch slam_toolbox online_async_launch.py use_sim_time:=false

# 4. Start the rosbridge_server for the Droid Vision Teleop
ros2 launch rosbridge_server rosbridge_websocket_launch.xml
On the Linux development machine, I launch RViz to visualize the robot in its world.
# 1. Launch RViz
rviz2 -d ~/dev/dev_ws/src/my_bot/config/view_bot_map.rviz
Cheers! :D